J’ai utilisé cette première image en fond d’écran pendant plusieurs
mois : ces teintes gris-bleu que le flou transforme en doux applats, je
pourrais les regarder des heures.

Et puis aujourd’hui j’ai trouvé ce tigre sur DeviantArt, et il redonne
des couleurs chaudes à mon bureau. C’est l’automne.
 I remember
my first attempts at programming outside my pocket calculator, 8 years
ago… I read a lot of things of GameBoy homebrew development, and decided
to code a small clone of Pokemon, for the GameBoy. Even without any
knowledge of C, or assembly, or hardware programming, or toolchains, it
was fun : I actually managed to get a moving character, basic
collisions, and a dynamically-loaded Pokemon-style map using the
original tiles.
I remember
my first attempts at programming outside my pocket calculator, 8 years
ago… I read a lot of things of GameBoy homebrew development, and decided
to code a small clone of Pokemon, for the GameBoy. Even without any
knowledge of C, or assembly, or hardware programming, or toolchains, it
was fun : I actually managed to get a moving character, basic
collisions, and a dynamically-loaded Pokemon-style map using the
original tiles.
The GameBoy was fully reverse-engineered some times ago, leading to the
development of several emulators — but one thing no one ever managed to
get is the boot ROM of these devices. Oh, it’s no big deal : unlike
the GameBoy Advance BIOS (which contain a lot of hard-to-emulate
compression and decompression routines), the boot ROM of a GameBoy is
very small, and doesn’t do much. It initialize some hardware registers,
displays the GameBoy logo, plays the sound, and check the CRC of the
cartridge. Additionally, the GameBoy Color sets up a color palette,
based on the combination of buttons pressed on startup, with a
hardcoded-list of specific palettes for a few games (like Super Mario,
Zelda, Metroid, etc.) Not very usefull, but still nice to have, for the
sake of computer history :)
Now why is getting this ROM so hard ? We could hack a small bit of
code that reads the ROM, load it into our favorite homebrew-loader
cartridge, and voilà. Well, the issue is that after it initialized the
hardware, the boot ROM locks itself, just before giving the control
to the cartridge code. That means you can’t read the boot ROM memory
location anymore. The only thing someone managed to do was to dump the
original black & white GameBoy ROM, using a powerfull microscope to read
the bits one-by-one on the chip — that’s how easy this locking
protection is to bypass.
 And
now this guy finally managed to dump the GameBoy Color
ROM — one week after getting the GameBoy
Color one. You can read all the
details on his page, and it is really
interesting — but if you only want a less-technical summary, here are
some explanations.
And
now this guy finally managed to dump the GameBoy Color
ROM — one week after getting the GameBoy
Color one. You can read all the
details on his page, and it is really
interesting — but if you only want a less-technical summary, here are
some explanations.
Basically, he breaked out the GameBoy Color case, and took control of
the cartridge connector, the CPU clock cristal and the CPU voltage. That
means he could inject any code he wants, and control the CPU speed and
power — even stop the CPU completely. Now the idea was to avoid the
execution of the locking-bit, the instruction at the end of the boot ROM
code that locks access to this part of the memory. And the best way is
to confuse the CPU, so it would somehow skip this locking
instruction.
So he overclocked heavily the CPU, hoping that it would disfunction, and
skip the locking instruction. But unlike the original GameBoy, the
GameBoy Color CPU is very well-engineered, and the CPU wouldn’t
misbehave.
Then he tried to completely halt the CPU for a few seconds, plus cut the
power for good measure. And then, when waking up the CPU, a lot of
strange glitches would happen, as some of the internal state had been
lost. At some point, the boot ROM could even jump to a completely random
location in the memory : maybe in the video buffer, maybe in the RAM… or
maybe in the cartridge code.
So he filled his cartridge code with a lot of “NOP” (do-nothing
instructions), followed by a “JMP dump”, that would go straight to his
dumping routine. Then he started the boot ROM, and began to confuse the
CPU. At some point, the boot ROM code jumped to a random location on the
cartridge code, and arrived in the middle of NOP codes — it went down
all the NOPs, reached the JMP, and started executing the dumping
routine. Without having completed the boot ROM code, that is without
the locking-bit enabled. And here we go : we can read the boot ROM
memory location, and dump the 256 bits code.
If you’re interested, you can get a commentated
dissassembly
of the dumped ROM — beware, work in progress. And don’t forget to read
about the FPGABoy project — you wouldn’t miss a
complete GameBoy implementation in VHDL, would you ?
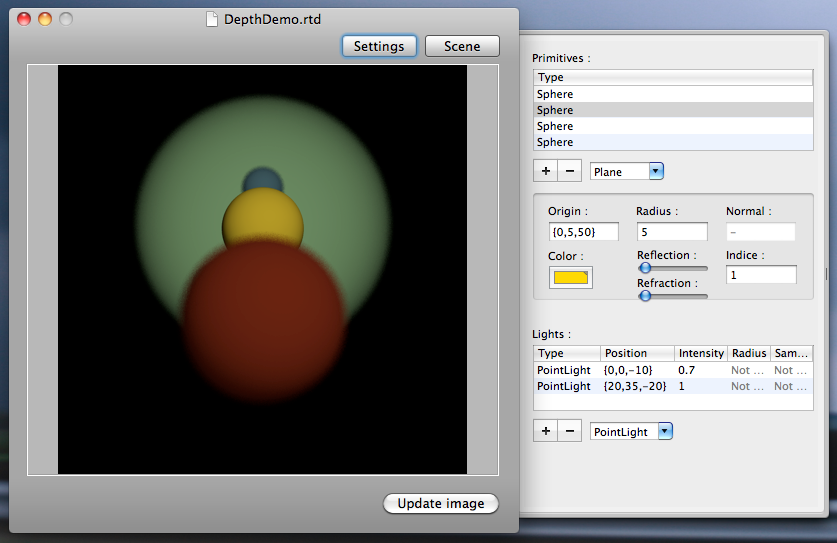
A screenshot of my current project.
Supports reflection, refraction, area sources, depth of field and
multisampling. Internaly, it uses Cocoa, bindings for the UI, and Grand
Central Dispatch for asynchronous computations.
I discovered recently that my Macbook Pro Unibody (i.e. mid-2009
models, but anything with a 9600M graphic chip should do) is good enough
to run PS2 games at decent speed, provided you use a recent version
of PCSX2. I spent a few days tweaking the
settings - so here are my advices if you want to give it a try.
These settings are tested on a Macbook Pro Unibody 13” - but most of
them should be valid for other architectures. First, some general
configuration settings:
- Graphics:
- GsDX works well - go for it
- Use “Native resolution”
- Use DirectX 10 to prevent a few minor glitches (like a faint
grid around the characters). Plus it allows switching
windowed/fullscreen on the fly.
- Use F5 in-game to see which (de-)Interlacing mode works best for
you
- Sound:
- I didn’t played a lot with the settings, standard config will do
- CPU:
- Don’t forget to activate the Multithreaded GS : you have a Core
2 Duo, right ?
- Speedhacks:
- Generaly, you can check all the recommanded speed hacks - and
disable just the most dangerous ones
- “VU cycle stealing” as “Slight” is a good bet - try “Moderate”
if everything runs well
And now some Shadow of the Colossus-specific tricks:
- Graphics:
- You don’t have to use any (de-)interlacing mode : the game takes
care of this itself. There is an in-game setting for Progressive
Scan, which works well - but I personally thinks that the
picture looks crisper in Non-progressive (i.e. interlaced mode),
plus the game will produce a neat motion-blur instead of
unmatched horizontal lines.
- The game will be (very) slightly faster in 4/3 screen ratio
(this is an in-game setting, btw)
- CPU:
- MicroVU works fine - not really faster, but cleaner, they say.
Here we go.
- “Limit frames” if you want, but don’t use frameskip: the display
flickers, and SotC already skips frames if needed
- Speedhacks:
- SotC loves “x2 cycle rate”, and it is a big speedup
- You can set “VU cycle stealing” to “Moderate” without major
glitchs
- Advanced:
- A neat trick for SotC is to set all “Clamp mode”s to “None” :
big speedup expected
You should be able to play Shadow of the Colossus at somehow-full speed,
that is without slowdowns. The framerate itself is often not very high,
but I think the original game wasn’t much better : SotC is beautifull,
but resource-intensive, even on a real PS2.
I also tried a CD of Final Fantasy XII, which runs even better : it is
probably less resources-demanding. PCSX2 compatibility is very good
these days, so give a try to every PS2 game you own…
La bibliothèque publique de Champaign,
en plus d’enregistrer les livres en 5sc par RFID, en plus d’avoir des
Kindle, elle envoie des rappels pour les livres à rendre par
courriel. Ça n’a l’air de rien, mais c’est futé, pas cher, et ça rend
la vie plus facile. Ça, les enfants, c’est de l’adaptation aux nouvelles
technologies, et c’est cool.
Oh, et tout cela est gratuit si on habite à Champaign — même de
façon temporaire, et sans y payer d’impôts. Peut-être que la Vieille
Europe ça veut vraiment dire quelque chose… Pas forcément en négatif,
d’ailleurs. Mais en termes de liberté d’esprit, de facilité
d’innovation.