Mandelbrot evolution
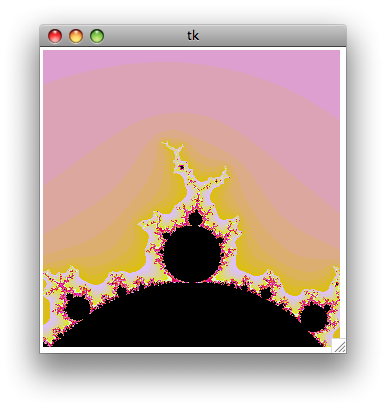
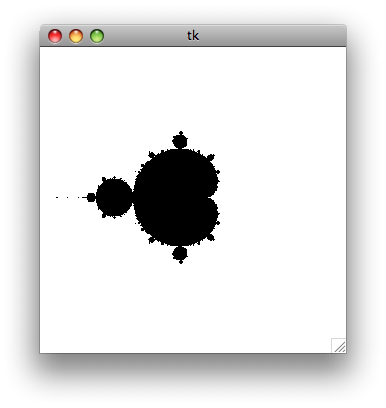
As promised in my previous post, here is a more evolved version of my Python simple Mandelbrot generator. This version adds color and zoom support, but it remains limited — it is meant to be simple, plus I’m still a Python beginner.
Read more to get the commented source :)
[python]import mathfrom Tkinter import *# Global variablescwidth = 300 # Width of the canvascheight = 300 # Height of the canvasloops = 200 # Maximum number of iterationszoomf = 4 # Zoom factorcomputing = False # Wether we're being computing the fractal or not# Global mandelbrot window coordinatesmx1 = -2my1 = 2mx2 = 2my2 = -2# Create a simple (and ugly) color palettedef make_palette(loops): # Create an empty array palette = [] for i in range (0, loops): # Generate an hex color code biased toward red c = ((i * 1000) + 0xDD9900) % 0xFFFFFF # Format the color code as #FFFFFF color = "#%06X" % c palette.append(color) # The end of the palette must be black... palette[loops-1] = "#000" # ... and the start too palette[0] = "#000" palette[1] = "#000" # Return the palette array return palette# Mandelbrot function# cv : canvas# palette : the color palette array# x1, y1 : coordinates of the uper left point of the window# x2, y2 : coordinates of the bottom right point of the windowdef mandel(cv, palette, x1, y1, x2, y2): # Clear the canvas cv.delete(ALL) # Compute the x and y increment dx = float(abs(x2 - x1)) / cwidth dy = float(abs(y2 - y1)) / cheight # Let's start the maths y = y1 for j in range(0, cheight): x = x1 for i in range(0, cwidth): x = x + dx c = complex(x, y) a = 0 # Core loop : x = x^2 + c, loop n times, see if the number escape a circle centered on 0 for k in range(0, loops): a = a*a + c if abs(a) > 4: break # Draw a plot of a color from the palette, # depending of when the point escaped from the loop cv.create_line(i, j, i, j + 1, fill = palette[k]) y = y - dy cv.update()# Compute a rectangular zoom window from the zoom factor# cx, cy : coordinates of the center of the zoom window# unZoom : specifies if we're unzooming instead of the default zoomingdef computeZoomRect(cx, cy, unZoom = False): global mx1, mx2, my1, my2, zoomf if unZoom: width = abs(mx2 - mx1) * float(zoomf) height = abs(my2 - my1) * float(zoomf) else: width = abs(mx2 - mx1) / float(zoomf) height = abs(my2 - my1) / float(zoomf) mousex = (cx / float(cwidth)) * abs(mx2 - mx1) + mx1 mousey = -(cy / float(cheight)) * abs(my2 - my1) + my1 zoomRect = [0, 0, 0, 0] zoomRect[0] = mousex - (width / float(2)) zoomRect[1] = mousey + (height / float(2)) zoomRect[2] = mousex + (width / float(2)) zoomRect[3] = mousey - (height / float(2)) return zoomRect# Draw a preview of the zoom window on the canvasdef mouseMove(event): global c, cwidth, cheight, zoomf, zoomRect, computing # Draw rectangle only if we finished to compute the fractal if computing == True: return # Compute rect half-width and half-height hwidth = (cwidth / zoomf) / 2 hheight = (cheight / zoomf) / 2 # Delete previous zoom Rect c.delete(zoomRect) # Create a new zoomRect around the current mouse location zoomRect = c.create_rectangle(event.x - hwidth, event.y - hheight, event.x + hwidth, event.y + hheight, width=1) return# Zoom functiondef zoom(event): global mx1, mx2, my1, my2, c, palette, computing # If we are already computing, do nothing and return if computing == True: return # Compute a zoom window rect = computeZoomRect(event.x, event.y) # Update the global coordinates mx1 = rect[0] my1 = rect[1] mx2 = rect[2] my2 = rect[3] # Draw the fractal computing = True mandel(c, palette, mx1, my1, mx2, my2) computing = False return # Unzoom functiondef unzoom(event): global mx1, mx2, my1, my2, c, palette # If we are already computing, do nothing and return if computing == True: return # Compute a zoom window rect = computeZoomRect(event.x, event.y, True) # Update the global coordinates mx1 = rect[0] my1 = rect[1] mx2 = rect[2] my2 = rect[3] # Draw the fractal computing = True mandel(c, palette, mx1, my1, mx2, my2) computing = False return# Create window and canvasroot = Tk()c = Canvas(root,width = cwidth, height = cheight)zoomRect = c.create_rectangle(0,0,0,0)c.pack()# Register eventsc.bind('', zoom)c.bind('', unzoom)c.bind('', mouseMove)# Create the palettepalette = make_palette(loops)# Draw first mandelbrotcomputing = Truemandel(c, palette, mx1, my1, mx2, my2)computing = False# Run event looproot.mainloop()

 Si vous gérez votre emploi du
temps avec Google Calendar, vous seriez peut-être content de pouvoir
utiliser également l’excellent iCal sous Mac, en synchronisant les deux.
Pour récupérer les agendas Google dans iCal, pas de soucis : une simple
URL à copier dans iCal suffit. Mais que faire quand on veut également
envoyer les événements iCal vers Google Calendar ?
Si vous gérez votre emploi du
temps avec Google Calendar, vous seriez peut-être content de pouvoir
utiliser également l’excellent iCal sous Mac, en synchronisant les deux.
Pour récupérer les agendas Google dans iCal, pas de soucis : une simple
URL à copier dans iCal suffit. Mais que faire quand on veut également
envoyer les événements iCal vers Google Calendar ?